
This guide attempts to walk you through installing a faxing solution on top of Asterisk that has FreePBX as it’s frontend GUI/dialplan generator.
So for it to work, you need to be
1) Using CentOS (this is a CentOS 7 guide btw). Tested on CentOS 7.7, 64bit
2) Have a working Asterisk (tested on 13,16) either locally on same box or a remote box. If locally, the IAXModem as shown below, points to itself I.e. 127.0.0.1, if it’s somewhere, just change the IP
3) Running FreePBX 13 or higher (unless you do manual dialplans)
The process is as follow:
1) Create an IAX extension on FreePBX
2) Install IAXModem – Configure at least one virtual serial port
3) Install Hylafax+ – “Bind” the modem you just created above into Hylafax+
4) Install Avantfax, create users and assign users to each modem
5) Use Avantfax to login and retrieve/send faxes

FreePBX IAX extensions (the FAX number)
1) Create an IAX2 extension in FreePBX, insert the DID and CID so that calls can come into that extension
2) Click on the newly created IAX extension and modify the port (not use port 4569, example below is 4800 and the next IAX2 extension for fax can then use port 4801, so on. This will correspond to the ttyIAX0 file setup below.
3) Apply configuration
4) Go back to that IAX extension again you just created, and set requirecalltoken to no. This is required for all subsequent FAX extensions.
Update your system
1) # yum update
Install and configure IAXModem
Install and configure first IAXModem which will then map to the newly created extension above. If you use device/user mode you need to fix the user to an extension and use the user as the username and password in the IAXModem setup below.
1) # yum install libtiff-tools libtiff-devel
2) # adduser uucp
3) # cd /usr/src/
4) # wget http://repo.firewall-services.com/centos/7/x86_64/iaxmodem-1.3.0-1.el7.fws.x86_64.rpm && rpm -Uvh iaxmodem-1.3.0-1.el7.fws.x86_64.rpm
5) # cd /etc/iaxmodem && rm iaxmodem-cfg.ttyIAX
Create our first modem config as below
5) # nano ttyIAX0 (see something like this below). Note, if you are running Asterisk on this same box, then use 127.0.0.1 as your server IP otherwise point that 127.0.0.1 to the IP of your Asterisk server. Highlighted items need to be changed each time you add another fax extension. Example, ttyIAX1, 4801, 5501 are running numbers based. The password is what you set, of course. This example below is for our first modem, ttyIAX0
device /dev/ttyIAX0
owner uucp:uucp
mode 660
port 4800
refresh 3600
server 127.0.0.1
peername 5500
secret myCOMPLEX123pass
codec ulaw
6) You now need to set the modem to auto start / restart. There are two services that needed to be loaded, iaxmodem itself and faxgetty. Iaxmodem is loaded by start/stop. Faxgetty (provided by hylafax+) is loaded with systemd as explained below.
7) # nano /etc/systemd/system/ttyiax0.service (NOTE: The digits are running digits based on this guide). Paste like below, again, modify accordingly. Note, the ampersand (&) is used to return to shell if started/stopped manually.
[Unit]
Description=HylaFAX faxgetty for ttyIAX0
[Service]
User=root
Group=root
Restart=always
RestartSec=30
ExecStart=/usr/sbin/faxgetty ttyIAX0 &
[Install]
WantedBy=multi-user.target
8) # systemctl enable ttyiax0.service
9) Start yourfirst modem, although its a system mode of starting, systemctl will take care of it.
9) # systemctl enable iaxmodem && systemctl start iaxmodem
10) # ps -ef |grep iaxmodem
You should see your first modem there
11) On your asterisk server # asterisk -rx “iax2 show peers”. You should see that your extension above, 5500 is now registered and should show you OK, it may take a while before registration is up.
IAXModem is now done and is registered to Asterisk (ready to receive calls, you can try to dial and you will hear the ringing but no picks up yet, this is hylafax’s job to pick up and send you the fax sound)
Install and configure Hylafax
1) # yum install hylafax+
2) Time to configure hylafax and this is done once. Answer defaults, unless specified or suggested herein. You might want to setup the names representing your country, dial codes etc. You will end this with the final question, ie “Are these OK”. Restart the hylafax service when asked. And setup the first modem. Run faxsetup like shown below.
3) # faxsetup
When the faxsetup calls the faxaddmodem script, when it asks “Serial port that modem, enter the modem name above which like ttyIAX0), it will then ask you to enter you country code, area code and phone number, enter anything you wish there. For the rest of the questions, enter default values . Finally it will probe our modem and if that worked it will say OK and tell you what class modem you’re running. I will explain how to just add new modems in later part.
4) Let’s add hylfax services to autostart
# systemctl enable hylafax-hfaxd
# systemctl enable hylafax-faxq
5) For each modem you created in faxaddmodem a file will be created in /var/spool/hylafax/etc/
6) # nano /var/spool/hylafax/etc/config.ttyIAX0, at the end of this file add the following
FaxRcvdCmd: bin/faxrcvd.php
DynamicConfig: bin/dynconf.php
UseJobTSI: true
You can start/restart hylafax. Also now, we start the modem faxgetty service as described above. So, hylafax setup done and faxaddmodem done for first modem, if you dial 5500 now, you can hear the fax tone.
# systemctl restart hylafax-hfaxd
# systemctl restart hylafax-faxq
# systemctl start ttyiax0.service
#NOTE: Sometimes, faxgetty binary can be placed in /sbin/faxgetty instead of /usr/sbin/faxgetty. Do a “# locate faxgetty” and modify /etc/systemd/system/ttyiax0.service accordingly. Of course, once you get this right, you just copy to the next fax service e.g. ttyiax1. Then do a # systemctl daemon-reload to reload settings before starting it and restart hylafax with
# systemctl restart hylafax-hfaxd
# systemctl restart hylafax-faxq
Install and configure AvantFax
1) # yum install mariadb-server httpd php php-devel php-pear php-mysql php-mbstring php-pecl-Fileinfo ImageMagick-devel -y
2) # cd /usr/src
3) # wget http://jaist.dl.sourceforge.net/project/avantfax/avantfax-3.3.5.tgz
4) # tar -zxvf avantfax-3.3.5.tgz
5) # cd avantfax-3.3.5
6) # pear install Mail Net_SMTP Mail_mime MDB2_driver_mysql
Start mysql / mariadb and setup mariadb, remember the root password to be used later on.
7) # systemctl start mariadb && mysql_secure_installation
8) # nano create_tables.sql
9) When editing this file, right on top of this file insert “USE avantfax;” without quotes.
Now we will edit the config file and ensure the settings here are correct, e.g. ROOTMYSQLPWD is the root MySQL user, supply its password, pay attention to the httpuser and httpgroup (you can do a ps –ef |grep httpd and see what user httpd is running) and location of hylafax bin, which usually is in /usr/sbin/hylafax
10) # nano rh-prefs.txt
Now edit the rh-install.sh file, change RPMS=”$RPMS mysql-server” to RPMS=”$RPMS mariadb-server and change RPMS=”$RPMS vixie-cron” to RPMS=”$RPMS cronie“
11) # nano rh-install.sh
Now, let’s actually install
12) # bash rh-install.sh
13) You should see Installation complete without critical errors.
You can now login to the site /avantfax. If you can’t it’s likely due to firewalld/iptables. Please allow rule port 80/tcp.
NOTE: If you’re running FreePBX, you can move the avantfax directory into /var/www/html (the default root directory for FreePBX installs)
# mv /var/www/avantfax/ /var/www/html/
IF you’ve moved the folder to /html/avantfax, do the following, otherwise, the install script above should do all these already.
# chown -R apache.apache /var/www/html/avantfax
# chmod -R 777 /var/www/html/avantfax/tmp /var/www/html/avantfax/faxes
# ln -s /var/www/html/avantfax/includes/faxrcvd.php /var/spool/hylafax/bin/faxrcvd.php
# ln -s /var/www/html/avantfax/includes/dynconf.php /var/spool/hylafax/bin/dynconf.php
# ln -s /var/www/html/vantfax/includes/notify.php /var/spool/hylafax/bin/notify.php
14) When install completes, it may point you to some initial setup, login as admin and default password, password. Change the password, then head on to the little superman logo on top right and click the settings logo, where we will add modems, users etc.
Creating new users/faxes/devices etc. using the pulldown menu in Avantfax.
From the pulldown menu create new modems, for each modem you created in CLI, set it up also in AvantFax. Modems can be mapped to users, which is what we will do later below. Under the pull-down menu, select modems. Create the modem when you configured iaxmodem/hylafax as above. Here we are configuring ttyIAX0

Now, using the pulldown menu, select new user. Add as you please, remember the username set herein.

IMPORTANT! – After you create a new user, you also need to manually set it on cli. So in this case, I’ve created user sanjay and must delete this user and recreate via cli like below; Always follow this order, Avantfax first, CLI later.
# faxdeluser sanjay
# faxadduser sanjay
User sanjay for instance now can login to: http(s)://<IPADDRESS>/avantfax/ and start receiving and sending faxes. You can also now map an incoming DID to this extension 5500 or send out fax like how you would if you have PSTN sorted. If you don’t have PSTN setup yet, simply create another modem, user etc to send within each other. The number to call then would be each other’s extension, e.g. from user sanjay (mapped to IAX0) can send to user fax0 (mapped to IAX1). I will explain how to setup just a new modem/user below.
To create more users/extensions, In this example, I am adding a 2nd modem, 2nd user etc..
1) Create a new iax2 extension in FreePBX, e.g. 5501, disable tokens and change port to 4801 (notice the increments in last digit, keep going for more new adds)
2) Add modem
# nano /etc/iaxmodem/ttyIAX1
device /dev/ttyIAX1
owner uucp:uucp
mode 660
port 4801
refresh 3600
server 127.0.0.1
peername 5501
secret myCOMPLEX123pass
codec ulaw
3) Create the associated service for modem ttyIAX1
# nano /etc/systemd/system/ttyiax1.service
[Unit]
Description=HylaFAX faxgetty for ttyIAX1
[Service]
User=root
Group=root
Restart=always
RestartSec=30
ExecStart=/usr/sbin/faxgetty ttyIAX1 &
[Install]
WantedBy=multi-user.target
# systemctl restart iaxmodem && systemctl start ttyiax1.service && systemctl enable ttyiax1.service
4) Now, let’s add modem in hylafax (Note, just follow defaults except you want to set “Nothingsetup” to something meaningful as this is the fax Identifier)
# faxaddmodem
Once that’s complete, edit the file created by hylafax and add the below that file the following; in the above ttyIAX1 edit # nano /var/spool/hylafax/etc/config.ttyIAX1
FaxRcvdCmd: bin/faxrcvd.php
DynamicConfig: bin/dynconf.php
UseJobTSI: true
Now restart hylafax
# systemctl restart hylafax-hfaxd && systemctl restart hylafax-faxq
5) For the sake to complete the guide, we will create a new user in Avantfax, and setup this user to this newly created modem. Let’s call this user fax1 and associate ttyIAX1 to this user.
Sign in as administrator into your avantfax page, look for the superman logo and click the icon next to it. Using the pulldown menu, select Modems.
Create new as device ttyIAX1
6) Then go to menu and create new user, let’s call it fax1, setup accordingly and associate it to modem ttyIAX1. Then execute in cli
# faxdeluser fax1 && faxadduser fax1
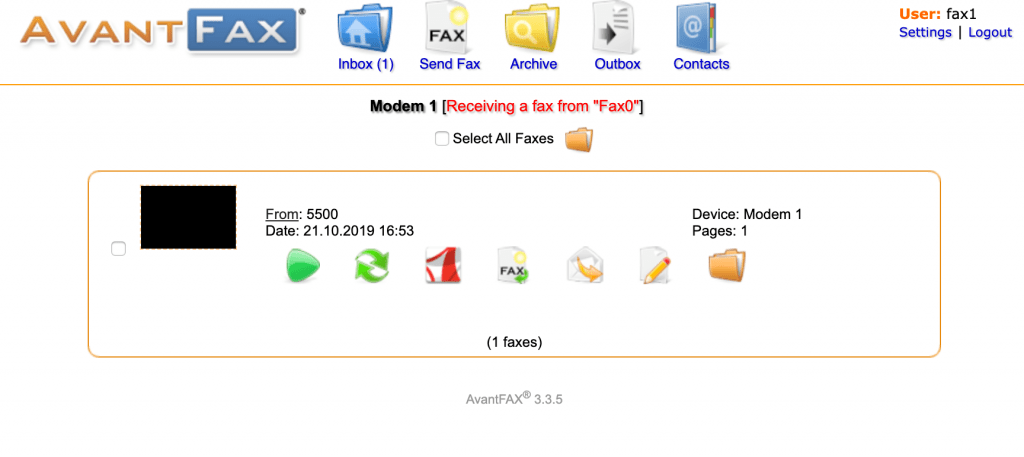
7) Now login as sanjay (which uses 5500) and send to fax1 (number 5501). Wait for a while then login to fax1 and see if you’ve received. Admins can see all faxes.
8) Repeat 1-7 above for new modems, hylafax setup and avantfax user setup. You’re now done
9) To troubleshoot problems, look at the logs in the pulldown menu in Avantfax when signed in as admin. Usually its permissions on directories that messes things up or the location of the faxrcvd.php and dynconf.php have wrong permissions or is not properly linked.
10) Here’s a fax i just received after finishing this guide.
As usual please send us feedback sanjay!–at–!astiostech.com or comment your questions. Will try to answer them.